Monday, January 25, 2010

Ciabatta phone home...

I made some more spent grain bread (loaves this time) and a batch of ciabatta last weekend. Ciabatta can be fun to make because it is so oddly shaped, and I found most of the shaping instructions pretty strange. Apparently, ciabatta means slipper, which I do find kind of weird and slightly unappealing, despite my love of both food and shoes. This is my second attempt at ciabatta, which is not too difficult to make.  It is another bread that requires no kneading, just a lot of intense mixing and then folding of really wet dough. This is again out of BBA - I swear one of these days I'll make some bread from a different book. I think next time I will increase the hydration percentage to get more of the giant holes in the crumb. The dough was fairly easy for me to work with using the formula from the book.

One thing I don't have are baker's linens. When I need to prop things up for a rise (like ciabatta or baguettes) I improvise with parchment paper and a bunch of Adam's old shirts underneath to help support the bread while it rises. It looks weird, but it does the trick.


Ciabatta is also cool because right before you bake it, you stretch it out into the "slipper" shape. I haven't come across any other breads that are handled this way right before going in the oven. Usually, you want to be very gentle after proofing so the bread doesn't deflate, but these loaves have enough oven spring to handle it. Those are some giant slippers.


Then, as the bread was cooling innocently on the counter, Adam noticed that we weren't alone.


Once you see the E.T. hiding in the bread, it is impossible to unsee him. It is perhaps the creepiest baked item I have ever made, though I have had some pretty bizarre things made for me (Erin, I'm looking at you). He stared at us all night, and I considered sacrificing him in the name of eating fresh bread, but I felt bad. He had no arms or legs, no way of defending himself. A few days later, though, without a thought, I came home sort of hammered and toasted him with some butter. Compared to his twin loaf, however, I think he had it pretty good. That loaf didn't even get a story.


 Ciabatta RIP 1/16/10 - 1/22/2010

Monday, January 18, 2010

Hamburger and Hot Dog Buns


Sometimes it's easy to forget that even simple bread is awesome if you make it yourself. I have already written several posts about "fancy" breads, or difficult to execute breads like bagels (Bagels II is in the works, BTW). But a lot of the time, you just want some really good hamburger and hot dog buns. We don't eat much meat anymore, but Adam and I got a cooler full of Omaha steak products for Xmas, so some buns were needed.


I've tried usual white bread recipes to make buns, randomly found on the internet, but they are always lacking flavor and kind of plain. I also tried to make whole wheat buns once but they were so dense, no one wanted to eat them, me included.

I use the Italian bread formula from Bread Baker's Apprentice (honestly, go buy this book! The recipes are all so great!) but I add about 20g of powdered milk to make them a bit more tender, and I shape them into 10 buns per batch. I always forget how good this recipe is until I have a reason to make them again. I like to spray them with water before the final proof and sprinkle the sesame seeds on then, I think they stay on a little better during the cooking process. I'll try to get the formula written up soon, but if you need these buns ASAP you can always just order BBA!


Because the burger patties from Omaha steaks can be a little lackluster, we added blue cheese and sauteed mushrooms from our CSA box. They were delicious!


I know this was a little short, but its been a busy week. I made some ciabatta yesterday that had the same face as E.T. so you can expect some creepy bread baby pictures once I get that written up. Happy MLK Jr. Day!

Monday, January 11, 2010

Spent grain rolls and pain l'ancienne baguettes

A month or so ago, our short-lived post-doc Jamie invited the lab over for an impromptu lab meeting to watch him brew some beer. We ended up drinking a LOT of beer and playing the new Wii Super Mario Bros through to the end (we were there for many hours - go into a bubble!). Soon I hope to drink the beer he brewed that day, but to tide me over, I took the barley grains he used to brew the beer (the spent grains). I found this recipe for spent grain bread a while ago and had been dying to try it, and once I got my hands on some spent grains I went to work.

This is another Reinhart recipe (from a book I don't have yet, Whole Grain Breads) and the first thing I noticed is that it's 100% whole wheat. Now I love eating whole wheat bread, but in the past when I've tried to make it, I am always alarmed at how gooey and sticky the dough is and how hard it is to knead. It is frustrating and messy. The key to this recipe (which was a dream to make) is the biga and the soaker.

Basically, almost all of the flour used in this recipe is hydrated the day before. A soaker is just flour, salt, and water. Allowing the whole wheat to sit in water overnight helps release the sugars and softens the harder bran of the wheat. A biga is an overnight ferment, often used to impart additional flavor to a bread, and may also aid in gluten development. Using both for this recipe made the dough incredibly easy to knead, and hardly sticky at all because the flour had already evenly absorbed a lot of the moisture. I have never made a 100% whole wheat dough that was so easy to work with. Guess I have another book on the wish list!

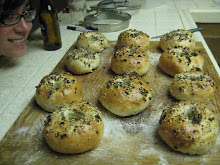
I made small rolls, and they turned out delicious. At the top is a picture of them proofing, and you can see some of the spent grains in the bread. Depending on the beer brewed, the bread will have a slightly different flavor. I was unsure if I would like the flavor (I love beer, so I don't know why I was unsure) but it was wonderful. A little nutty and very complex, only faintly tasting of beer and barley, and excellent right out of the oven.


The other batch of bread I made that day were pain l'ancienne baguettes, which are my go to baguettes because they require minimal work, the baguette version of the no-knead dutch oven bread, which I have actually never tried. This recipe is also from BBA, and I have made it probably a dozen times.

Pain l'ancienne
  • 6 cups/765 g unbleached bread flour
  • 2 1/4 teaspoons salt
  • 1 3/4 teaspoons instant yeast
  • 2 1/4 to 3 cups/538-680g ice water (yes, ice water)
I take Brita water out of the fridge and add some ice, let it sit for about 5 minutes while I weigh out the other ingredients, and then mix the dough. I mix until the dough comes off of the sides, but still sticks to the bottom of the bowl. Add water or flour as necessary until this happens, then mix until it's homogeneous. Then cover the bowl with saran wrap and stick it in the fridge immediately.

The next day, a couple of hours before you are ready to make the bread, take the bowl out and put it on the counter. Leave it there for 2 or 3 hours, until the dough is noticeably bigger and no longer cold. At some point in this 3 hours, turn your oven on to 500 F and if you have a baking stone, let it heat up in there.

Now comes the only difficult part - prepare your kneading surface with 1/4 cup sprinkled flour, then pour the dough onto this flour so it doesn't stick to everything. Add a little more flour to the top and pat it into a rough square or circle, about 6-8 inches wide. Cut this in half, and let the dough rest for a few minutes. Prepare some parchment paper to be the right size (cookie sheet size). Cut each half of the dough into three strips, and stretch them out to the length of the cookie sheet. This takes a little practice, but even if they look ugly, they will still taste good, so don't worry. I'll try to remember to photograph this step the next time I make these. It should look something like this:

I put the parchment right on my baking stone. If you don't have one, you can bake these on the back of a cookie sheet. You want to steam up the oven when you first put them in. My method is to heat an old cookie sheet up on the bottom rack and boil some water. When I put the loaves in, I pour the boiling water on the cookie sheet (be really careful, I have gotten some wicked burns doing this absent-mindedly). You can also spray the walls of the oven with water from a spray bottle a couple times for the next minute. Then turn the oven down to 475 F and bake for 20-25 minutes, rotating once.

I cut the second half of the dough into strips while the first half is baking, and cover them with saran wrap until they are ready to go in the oven. I love this bread because it requires so little work, and I just keep them frozen until I need a nice baguette! They are also about a jillion times easier to make than traditional baguettes.

Sunday, January 10, 2010

Giant Versatile Loaves of Focaccia

One of the first more advanced breads I attempted once I realized I was serious about this whole bread baking hobby is Peter Reinhart's poolish focaccia from the Bread Baker's Apprentice. I made it well before I had the book though. I found the recipe here, along with very thorough and helpful pictures and instructions. At first I was aghast at the amount of olive oil in this recipe, but it is absolutely delicious and anything less would leave it dry. Don't skimp on the olive oil! It's heart healthy!

I enjoyed this recipe so much that I went out and bought the book, which is the #1 book I recommend if you enjoy making bread. It is a testament to the quality of the book that many of the pages are stuck together with dough, stained with butter or oil, or are otherwise soiled from use on the counter.

This is now the bread I make for parties if I am otherwise uninspired, and everyone is always SO impressed, especially if I grate romano and parmesan to sprinkle on top for a delicious cheesy crust. I made a batch for Xmas and I saw the host's parents glance at each other with that guilty look as they reached for seconds.

One of the tastiest parts of this bread is the herb oil. I usually make a giant batch with fresh herbs, about 2 cups worth at a time, and keep it in the fridge until I feel like making focaccia again. Using fresh herbs makes a big difference in the flavor of the oil, and I put a ton of garlic in it as well (yum!). Another nice aspect of this recipe is that it can be made over three days, if you are pressed for time in the evenings like I am, by retarding after the first oil application in the refrigerator until the next day. Then it's only about 2 hours of "work" a night, if you can call bread slowly growing on the counter while you play Assassin's Creed II work.


Adam and I realized the first time I made it that the bread tastes, almost exactly, like the crust of a Pizza Hut pan pizza. I guess the Hut must put a ton of olive oil in their dough. I whipped up a focaccia pan pizza with Adam's homemade tomato sauce, 4 cheeses (mozzarella, romano, asiago, and parmesan), jalapenos and some dried Italian salami. I forgot to make the poolish the night before, so I made it first thing in the morning and let it spend most of the day fermenting, with a brief refrigeration. I also added some whey cubes we had in the freezer from our one attempt at cheesemaking, which I think makes the bread a little chewier. I decreased the final rise to one hour, because I didn't want the crust to be as fluffy as the bread alone. It cooked for about 30 minutes at 400 F instead of 450 F so the cheese didn't burn.


What a delicious, filling pizza. It is serious, we went back for seconds and then twenty minutes later were cursing our decision. If you don't like such thick crust, you can probably make two thinner pizzas with the same recipe, just cook them for a shorter period of time.


If you are looking to step up your breadmaking, give focaccia a chance. It's great because there is no kneading, just a lot of mixing in the beginning, and you get to poke it a lot with your fingers to make all the depressions, unlike the complicated shaping involved with many other types of fancy loaves. And you can make excellent pizza out of it!


Tuesday, January 5, 2010

Ring in the New Year with bagels!

Happy New Year! When I look back on 2009, I think of it as the year of bread baking.

Bagels. One of my favorite baked items, I remember voraciously eating garlic and salt bagels after ballet class when I was younger. Unfortunately, it is certainly a baked good that is never executed well in California. I don't know if it is the lack of Jews or if they simply don't realize what a bagel should taste like, but I have had a real craving for bagels since I moved to San Diego, and until recently this craving has been impossible to sate. The ubiquitous, fluffy Einstein bagels at the breakfast vendor shows are more like pieces of round bread than a real bagel. A real bagel is chewy and dense, and should fill your stomach and be super delicious.

So I began a quest for THE bagel recipe, one I can make at home that will quell my intense desires, rather than making me curse leaving the East Coast, like the "bagels" they have out here do. I have tried this one from allrecipes (Bagels II) which has been solid on two occasions, though the scientist (and baker) in me balks at having to measure ingredients by volume?? How unpredictable. How barbaric.


So for New Year's Day, I tried the recipe in Peter Reinhart's Bread Baker's Apprentice, because I could prepare it the night before, party it up and let them retard in the fridge, and simply boil and bake them the next day through my hangover (which, as expected, was killer. A truly spectacular human being invented powdered Gatorade).


These bagels were very easy to shape (a little too easy?) and I thought it would be a glorious New Year's Day. However, when I boiled them they sort of deflated, and rather than developing the nice brown chewy crust and mounded bagel shape I have come to expect from the allrecipes formula, I got these deflated pale toroid discs. Also, the baking time in the book is about half of what I think is required to cook a full size bagel in the oven.


Needless to say, I was disappointed. I believe what happened is the fridge became too warm due to the frequent removal of champagne, and the bagels over-proofed, leading to collapse upon boiling. The interior of the bagel was also too light in texture, and not chewy enough. I don't know how much of this was temperature, and how much was the formula. I mean, don't get me wrong, I still ATE three of them that day, but I knew it wasn't my best showing.


Everything bagels and poppyseed bagels, the food of the gods. Only the bagel closest in the picture looks as a bagel should. But fear not, there will be a bagel redux with my tried and true recipe coming soon, since I promised Natalie some cinnamon raisin. Maybe I'll be good enough to weigh out and write up the formula this time...