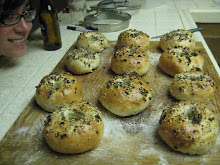
But it is so worth it when a beautiful piece of bread comes out of the oven and you realize that it has happened. You have learned the trick to shape it j-u-s-t right. It is so satisfying, just like when you pull your film out of the developer and your protein bands are right there, right where they should be! But so much more delicious! Oh, science.
The recipe I used for this is a variation on pain de campagne (country bread) from the BBA (where else?), but I added a considerable amount of rye flour. This dough is very pliable and easy to shape, and if you want to learn how to make different shapes I recommend starting with this type of formula. The recipe can be found here, all the way at the bottom, if you want to make this bread but don't own BBA (honestly, if you want to make this bread, you really should own it anyway so you can see how to make all the shapes)
I made it with the pate fermentee, and I also used more like 1 1/4 -1/2 cups bread four and 3/4 cup rye flour (specifically, 4 oz rye and 5 5/8 oz bread flour) in the dough. This makes it stickier and a little more difficult to handle, but I like the heartier flavor with more rye flour. You can also use whole wheat if you prefer.
The first step to making an epi is to shape the bread into a baguette. This skill alone took me around 6 batches of bread until I understood the oft-written phrase "a baker must have an iron fist in a velvet glove." You have to be firm and gentle. You have to let the dough relax if it starts to tear or if it is too elastic, and you can't get impatient with it. They key is to get good surface tension on the outside of the dough, effectively enclosing it in its own skin.
First, pre-roll the dough into loose rounds, then turn them upside down and try to make a more oblong shape, with the longer dimension going horizontally in front of you. The way I do it is to try to fold the dough in on itself in the middle, then alternately roll it against the surface to lengthen, very similar to rolling Play-Doh into long snakes. I usually do this twice, with a 5 minute dough rest in between. Otherwise, the dough is too elastic and either shrinks in length, or the outer "skin" necessary for good tension rips. It is definitely a skill that requires practice. Also, you can't be too rough with it, or all the air that has accumulated during the first rise will be pressed out. Its ok if they seem a little thin, if you shaped them right they should rise and get puffy. You want to make sure you roll the seam together and put it on the bottom of your loaf as it rises. I like to seam it up the side, the roll the loaf onto itself to close the seam and place it on the bottom.
The next step to making an epi is to cut the baguette with scissors to spread the "wheat grains" out on your parchment paper or Silpat. This is where my inattention to detail became obvious to me. It clearly says in BBA (and my other reference book, Bread by Jeffrey Hamelman) to allow the dough, shaped into a baguette, to rise. Just before putting it into the oven, cut the wheat grains. I, however, simply assumed it needed to happen immediately after shaping. Perhaps this is because the first time I made epis was Superbowl Sunday and I had partaken of the half keg upstairs without restraint, then the second time I assumed I already knew what I was doing (oops).
The second time I cut two before I reread the instructions to learn that, in fact, you must cut them after the proofing stage. The side by side comparison coming up makes it clear to me that this results in a far superior loaf of bread.
You want to cut your baguette almost parallel to your surface with scissors (clean them! don't be gross) as close to the bottom as possible. Try to leave just a tiny bit at the bottom attached. Splay the wheat grains out to alternate sides.
On the parchment is the loaf I cut before proofing, on the Silpat is the loaf I cut right before the oven.The epi on the left was cut pre-proofing, the one on the right was cut post-proofing. See how pointy and elegant the one on the right is, compared to its less defined, more bulbous sibling? How much more oven spring it got? Following the directions really DOES make things turn out better! I figured out epis!


No comments:
Post a Comment